Python Flask Windows Development Environment Setup
No more struggles Windows Python development! I’ve found this is the best way to configure your dev environment. This has made things much easier to get started and less of a headache overall.
We use Virtual Environment so we can test python code in encapsulated environments and to also avoid filling our base Python installation with a bunch of libraries we might use for only one project.
But Virtual Environments can be tricky if you don’t establish a good workflow. I’ll show you how to setup your python environment from Scratch and then do a very simple workflow using Flask.
SETUP 4 Steps: Install Python Install Pip Install VirtualEnv Install VirtualEnvWrapper-win
Install Python:
First Go to the Python Downloads Site.
As of March 2015 the download you want for a standard windows machine is Windows x86-64 MSI installer (The other download is for servers). Its circled here:

Run the installer! You’ll come across this page in the installer:
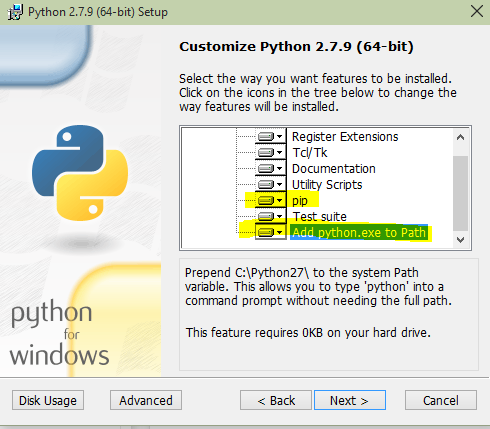
You’ll want to scroll down and add it to the path. If you don’t that’s okay. You can add it later. Adding Python to the PATH will allow you to call if from the command line.
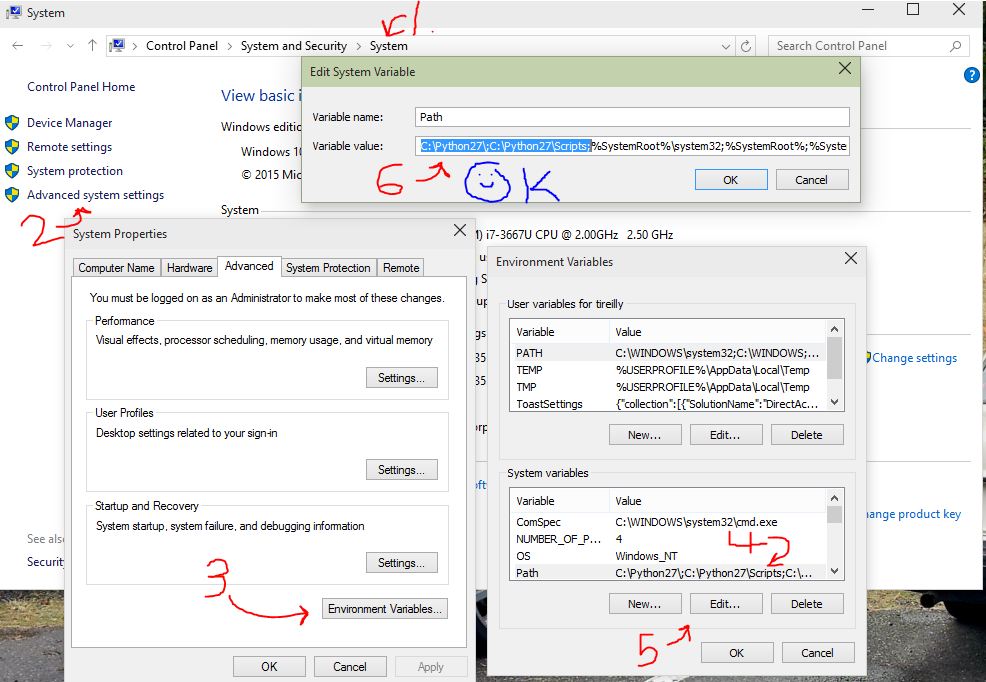
After the installation is complete double check to make sure you see python in your PATH. You can find your path by opening your control panel -> System and Security -> System -> Advanced System Settings -> Environment Variables -> Selecting Path -> Edit ->
Now you’re looking at your Path. Be Careful, if you delete or add to the path accidently you may break other programs.
You need to confirm that C:\Python27; and C:\Python27\Scripts; is part of your path.
If you do not see it in your path you can simply add it at the beginning or end of the variable value box. As you can see in the image below.
Install Pip:
As of Python Version 2.7.9 Pip is installed automatically and will be available in your Scripts folder.
If you install a later version of Python I would recommend installing it according to this helpful stackoverflow post.
Pip is a Package manager for python which we will use to load in modules/libraries into our environments.
An example of one of these libraries is VirtualEnv which will help us keep our environments clean from other Libraries. This sounds really confusing but as you start using it you’ll begin to understand how valuable this encapsulation of modules/libraries can be.
To test that Pip is installed open a command prompt (win+r->’cmd’->Enter) and try ‘pip help’
You should see a list of available commands including install, which we’ll use for the next part:
Install virtualenv:
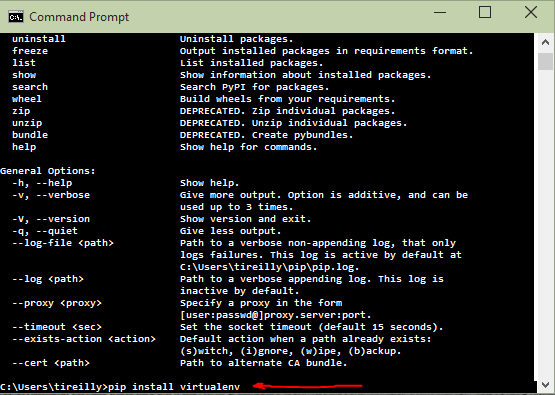
Now that you have pip installed and a command prompt open installing virtualenv to our root Python installation is as easy as typing ‘pip install virtualenv’ Like so:
Now we have virtualenv installed which will make it possible to create individual environments to test our code in. But managing all these environments can become cumbersome. So we’ll pip install another helpful package…
Install virtualenvwrapper-win:
This is the kit and caboodle of this guide.
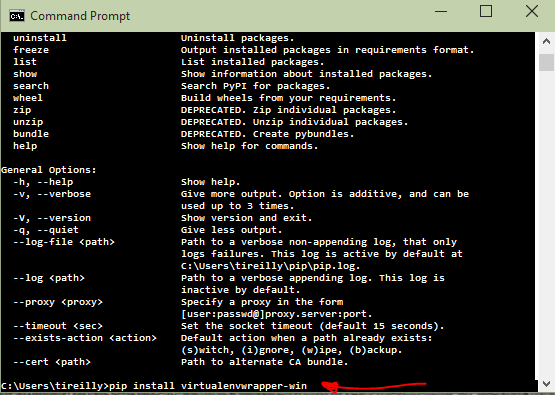
Just as before we’ll use pip to install virtualenvwrapper-win. ‘pip install virtualenvwrapper-win’ Like so:
Excellent! Now we have everything we need to start building software using python! Now I’ll show you how buttery smooth it is to use these awesome tools!
USAGE 7 Steps: Make a Virtual Environment Connect our project with our Environment Set Project Directory Deactivate Workon Pip Install Flask!
Make a Virtual Environemt:
Lets call it HelloWold. All we do in a command prompt is enter ‘mkvirtualenv HelloWold’ This will create a folder with python.exe, pip, and setuptools all ready to go in its own little environment. It will also activate the Virtual Environment which is indicated with the (HelloWold) on the left side of the prompt.

Anything we install now will be specific to this project. And available to the projects we connect to this environment.
Connect our project with our Environment:
Now we want our code to use this environment to install packages and run/test code.
First lets create a directory with the same name as our virtual environment in our preferred development folder. In this case mine is ‘dev’

HelloWold will be the root folder of our first project!
Set Project Directory:
Now to bind our virtualenv with our current working directory we simply enter ‘setprojectdir .’ Like so:

Now next time we activate this environment we will automatically move into this directory! Buttery smooth.
Deactivate:
Let say you’re content with the work you’ve contributed to this project and you want to move onto something else in the command line. Simply type ‘deactivate’ to deactivate your environment. Like so:

Notice how the parenthesis disappear. You don’t have to deactivate your environment. Closing your command prompt will deactivate it for you. As long as the parenthesis are not there you will not be affecting your environment. But you will be able to impact your root python installation.
Workon:
Now you’ve got some work to do. Open up the command prompt and type ‘workon HelloWold’ to activate the environment and move into your root project folder.
Like so:

Pretty sweet! Lets get working.
Pip Install:
To use flask we need to install the packages and to do that we can use pip to install it into our HelloWold virtual environment.
Make sure (HelloWold) is to the left of your prompt and enter ‘pip install flask’ Like so:

This will bring in all the tools required to write your first web server!
Flask:
Now that you have flask installed in your virtual environment you can start coding!
Open up your favorite text editor and create a new file called hello.py and save it in your HelloWold directory.
I’ve simply taken the sample code from Flask’s website to create a very basic ‘Hello World!’ server.
I’ve named the file hello.py.
Once the code is in place I can start the server using ‘python hello.py’ this will run the python instance from your virtual environment that has flask.
See here:
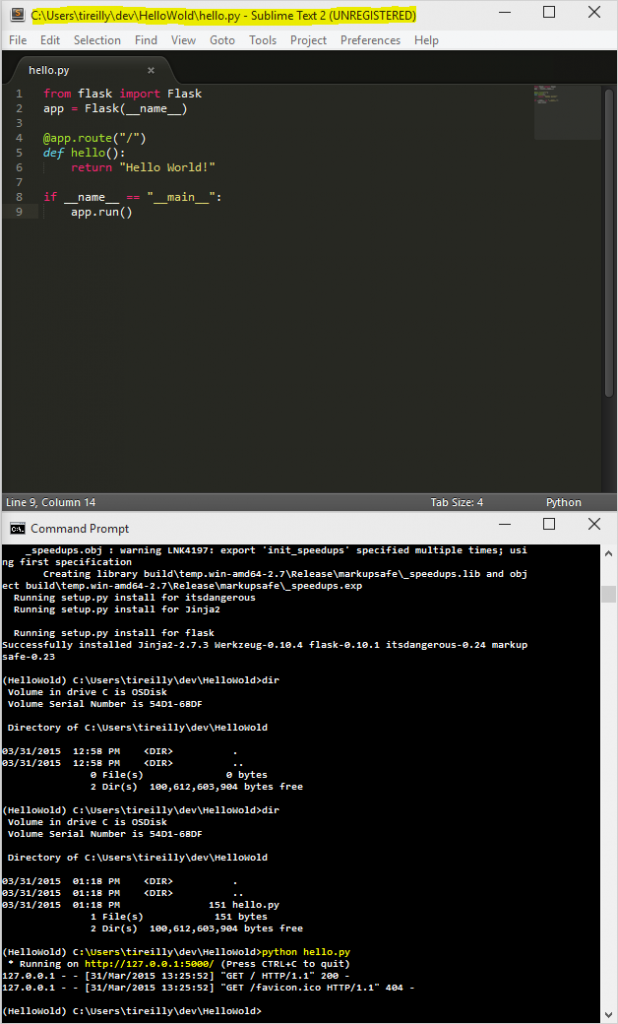
You can now navigate with your browser to http://127.0.0.1:5000/ and see your new site!
Sweet. You have everything you need to start working through tutorials on Flask without worrying about gunking up your Python installations.
Let me know if you have any questions! Happy Developing!
[caption id=”attachment_4131” align=”aligncenter” width=”660”] Art Deco From Afar[/caption]